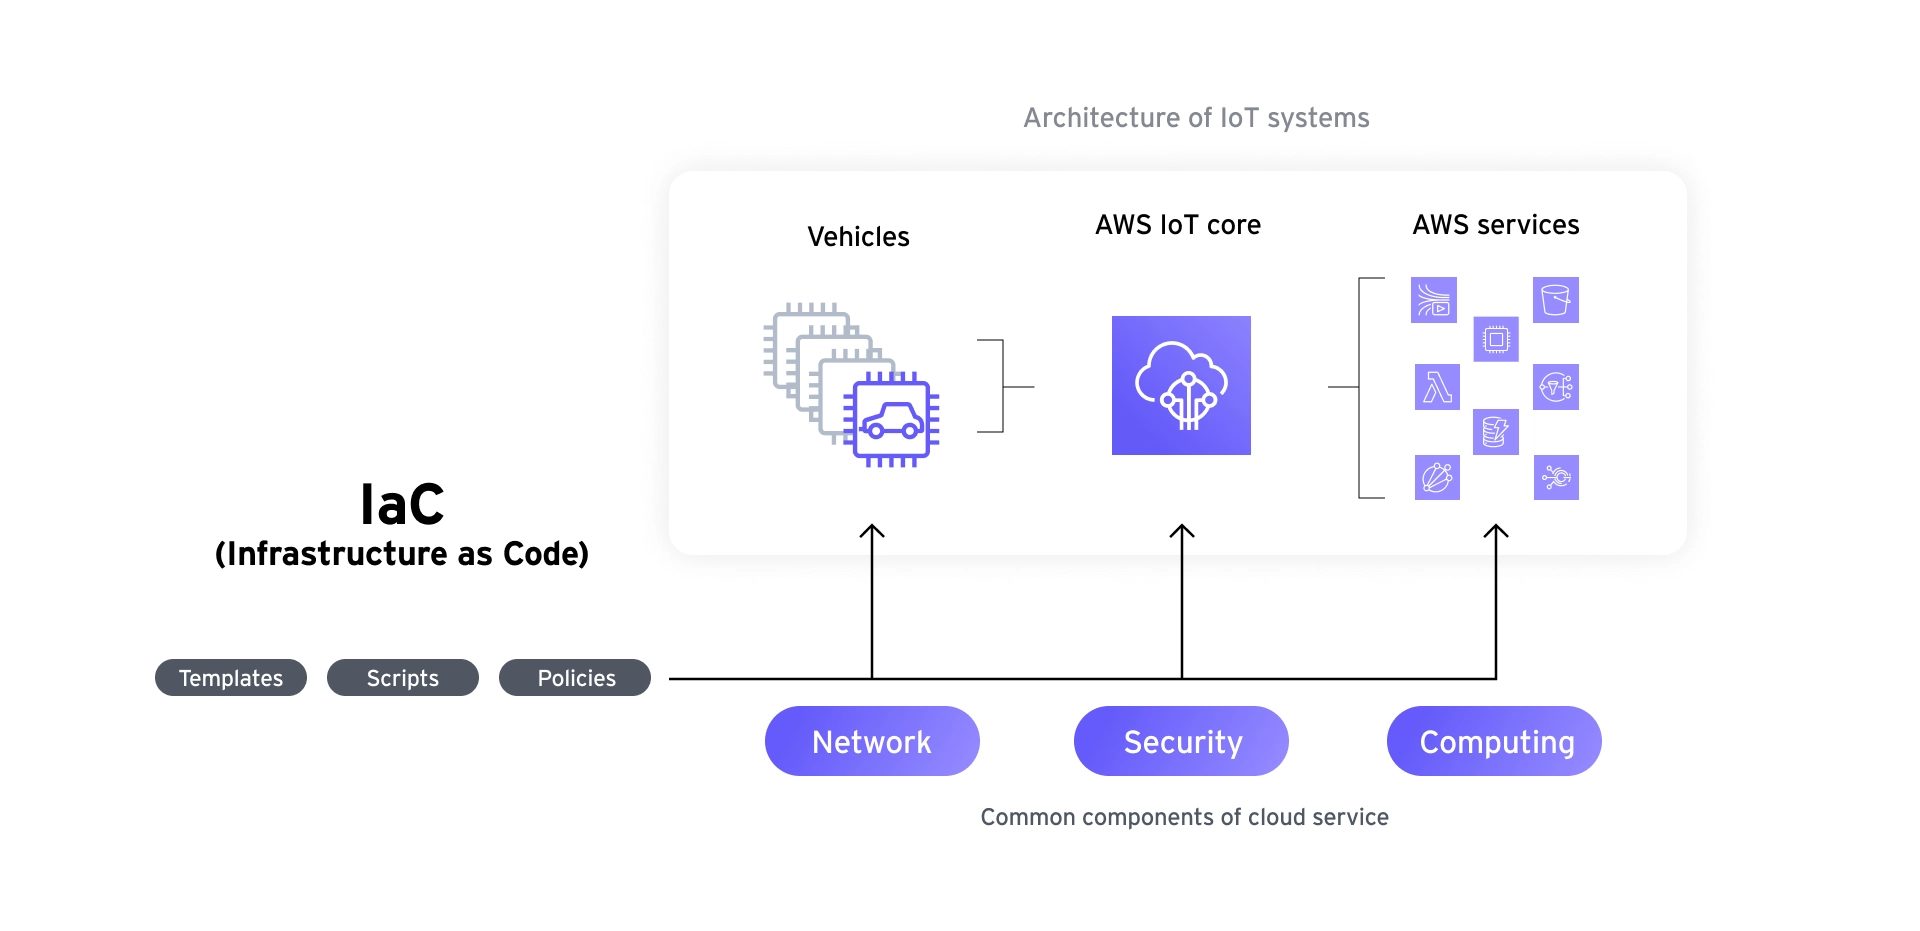
The AWS Cloud Development Kit (AWS CDK) is an open source software development framework that allows define cloud application resources to be defined using familiar programming languages. Infrastructure as code (IaC) is a declarative use of code for the management and deployment of infrastructure. AWS CDK generates resources by converting all written code into CloudFormation templates. AWS CDK is just one of many available IaC tools in the industry and another popular tools is Hashicorp Terraform. Terraform can be a little more difficult to adopt due to the introduction of it’s own proprietary coding language know as HCL. In contrast, AWS CDK is an official IaC tool provided by AWS and supports widley known coding languages that developers likely are already familiar with. For those who want to implement IaC for the first time in AWS, if lacking terraform experience, the CDK provided by AWS can be the better option.
1. AWS IoT Core
AWS IoT Core is an AWS service that connects and manages IoT devices and can be linked with other AWS services. AWS provides an SDK for IoT Core (SDK official page), and devices developed based on it make IoT Core easy to use. IoT Core is responsible for communicating with devices, as it’s name implies it plays a key role in AWS IoT Service. IoT Core enables message routing to be used with storage solutions such as AWS S3 and data pipelines such as MSK (Amazon managed Kafka). In addition, services such as Greengrass, FleetWise, and SiteWise can be utilized to increase the efficiency of IoT device operation and management.
In this article, AWS CDK will be used to construct a simple infrastructure with AWS IoT Core.
2. CDK Quick Start Guide:
2.1 CDK Installation
For full installation instructions reference the AWS CDK official installation guide.
Firstly install the CDK globally through the terminal:
npm install -g aws-cdk
Now run CDK commands and verify the installed version:
cdk --version
2.2 Starting a CDK Project
CDK supports several languages, including TypeScript (JavaScript), Python, Go, and .NET. In this article Typescript will be used. Create an empty directory to house the code, and start a CDK project from the terminal with the following command:
mkdir cdk-test-project && cd cdk-test-project
cdk init --language typescript
This will create the model directory structure in root for deploying and testing the CDK code.
cdk-test-project
├── README.md
├── bin
│  └── cdk-test-project.ts
├── cdk.json
├── jest.config.js
├── lib
│  └── cdk-test-project-stack.ts
├── node_modules
├── package-lock.json
├── package.json
├── test
└── tsconfig.json
Shell
The code will be created and located at /bin/cdk-test-project.ts and /lib/cdk-test-project-stack
When the cdk init command was ran a sample file located at /lib/cdk-test-project-stack.ts was create automatically. In CDK terminology a stack is where all AWS resources defined within it’s scope, either directly or indirectly, are provisioned as a single unit. The stacks defined in this way are packaged as apps in bin/cdk-test-project.ts and structured for deployment. If defined in multiple stacks, they can be defined them inside the /lib directory and added in to the app in /bin/cdk-test-project.ts directory.
2.3 Connecting a CDK project
To connect the locally created code to an AWS cloud environment, first bootstrap an AWS environment. This will provision resources the AWS CDK needs to perform the deployment.
Run the following command replacing the account number and region applicable values.
cdk bootstrap aws://ACCOUNT-NUMBER/REGION
2.4 CDK Project Deployment
Once finished writing the code, output the code into a compiled AWS CloudFormation template using the cdk synth command in the terminal project directory. The execution result of this command creates a cdk.out directory in the root directory and stores the results.
cdk synth
cdk diff command allows comparison of existing deployed infrastructure in an AWS account with the code defined locally. This is useful for checking what will be deployed, deleted, or updated prior to execution.
cdk diff
When the cdk deploy is ran it will create the cloud formation templates, check the state of existing resources in the AWS account, and then make the necessary changes to reach the desired state defined in CDK code. When deploying defining which stacks are deploy can be managed by specifying the name of the app or deploying them all with a single command.
cdk deploy # When there is only one defined stack
cdk deploy STACK_NAME # When there is multiple defined stacks and you wish to deploy one
cdk deploy --all # When there is multiple defined stacks and you wish to deploy all
IoT Systems / Scenario
1. IoT Architecture
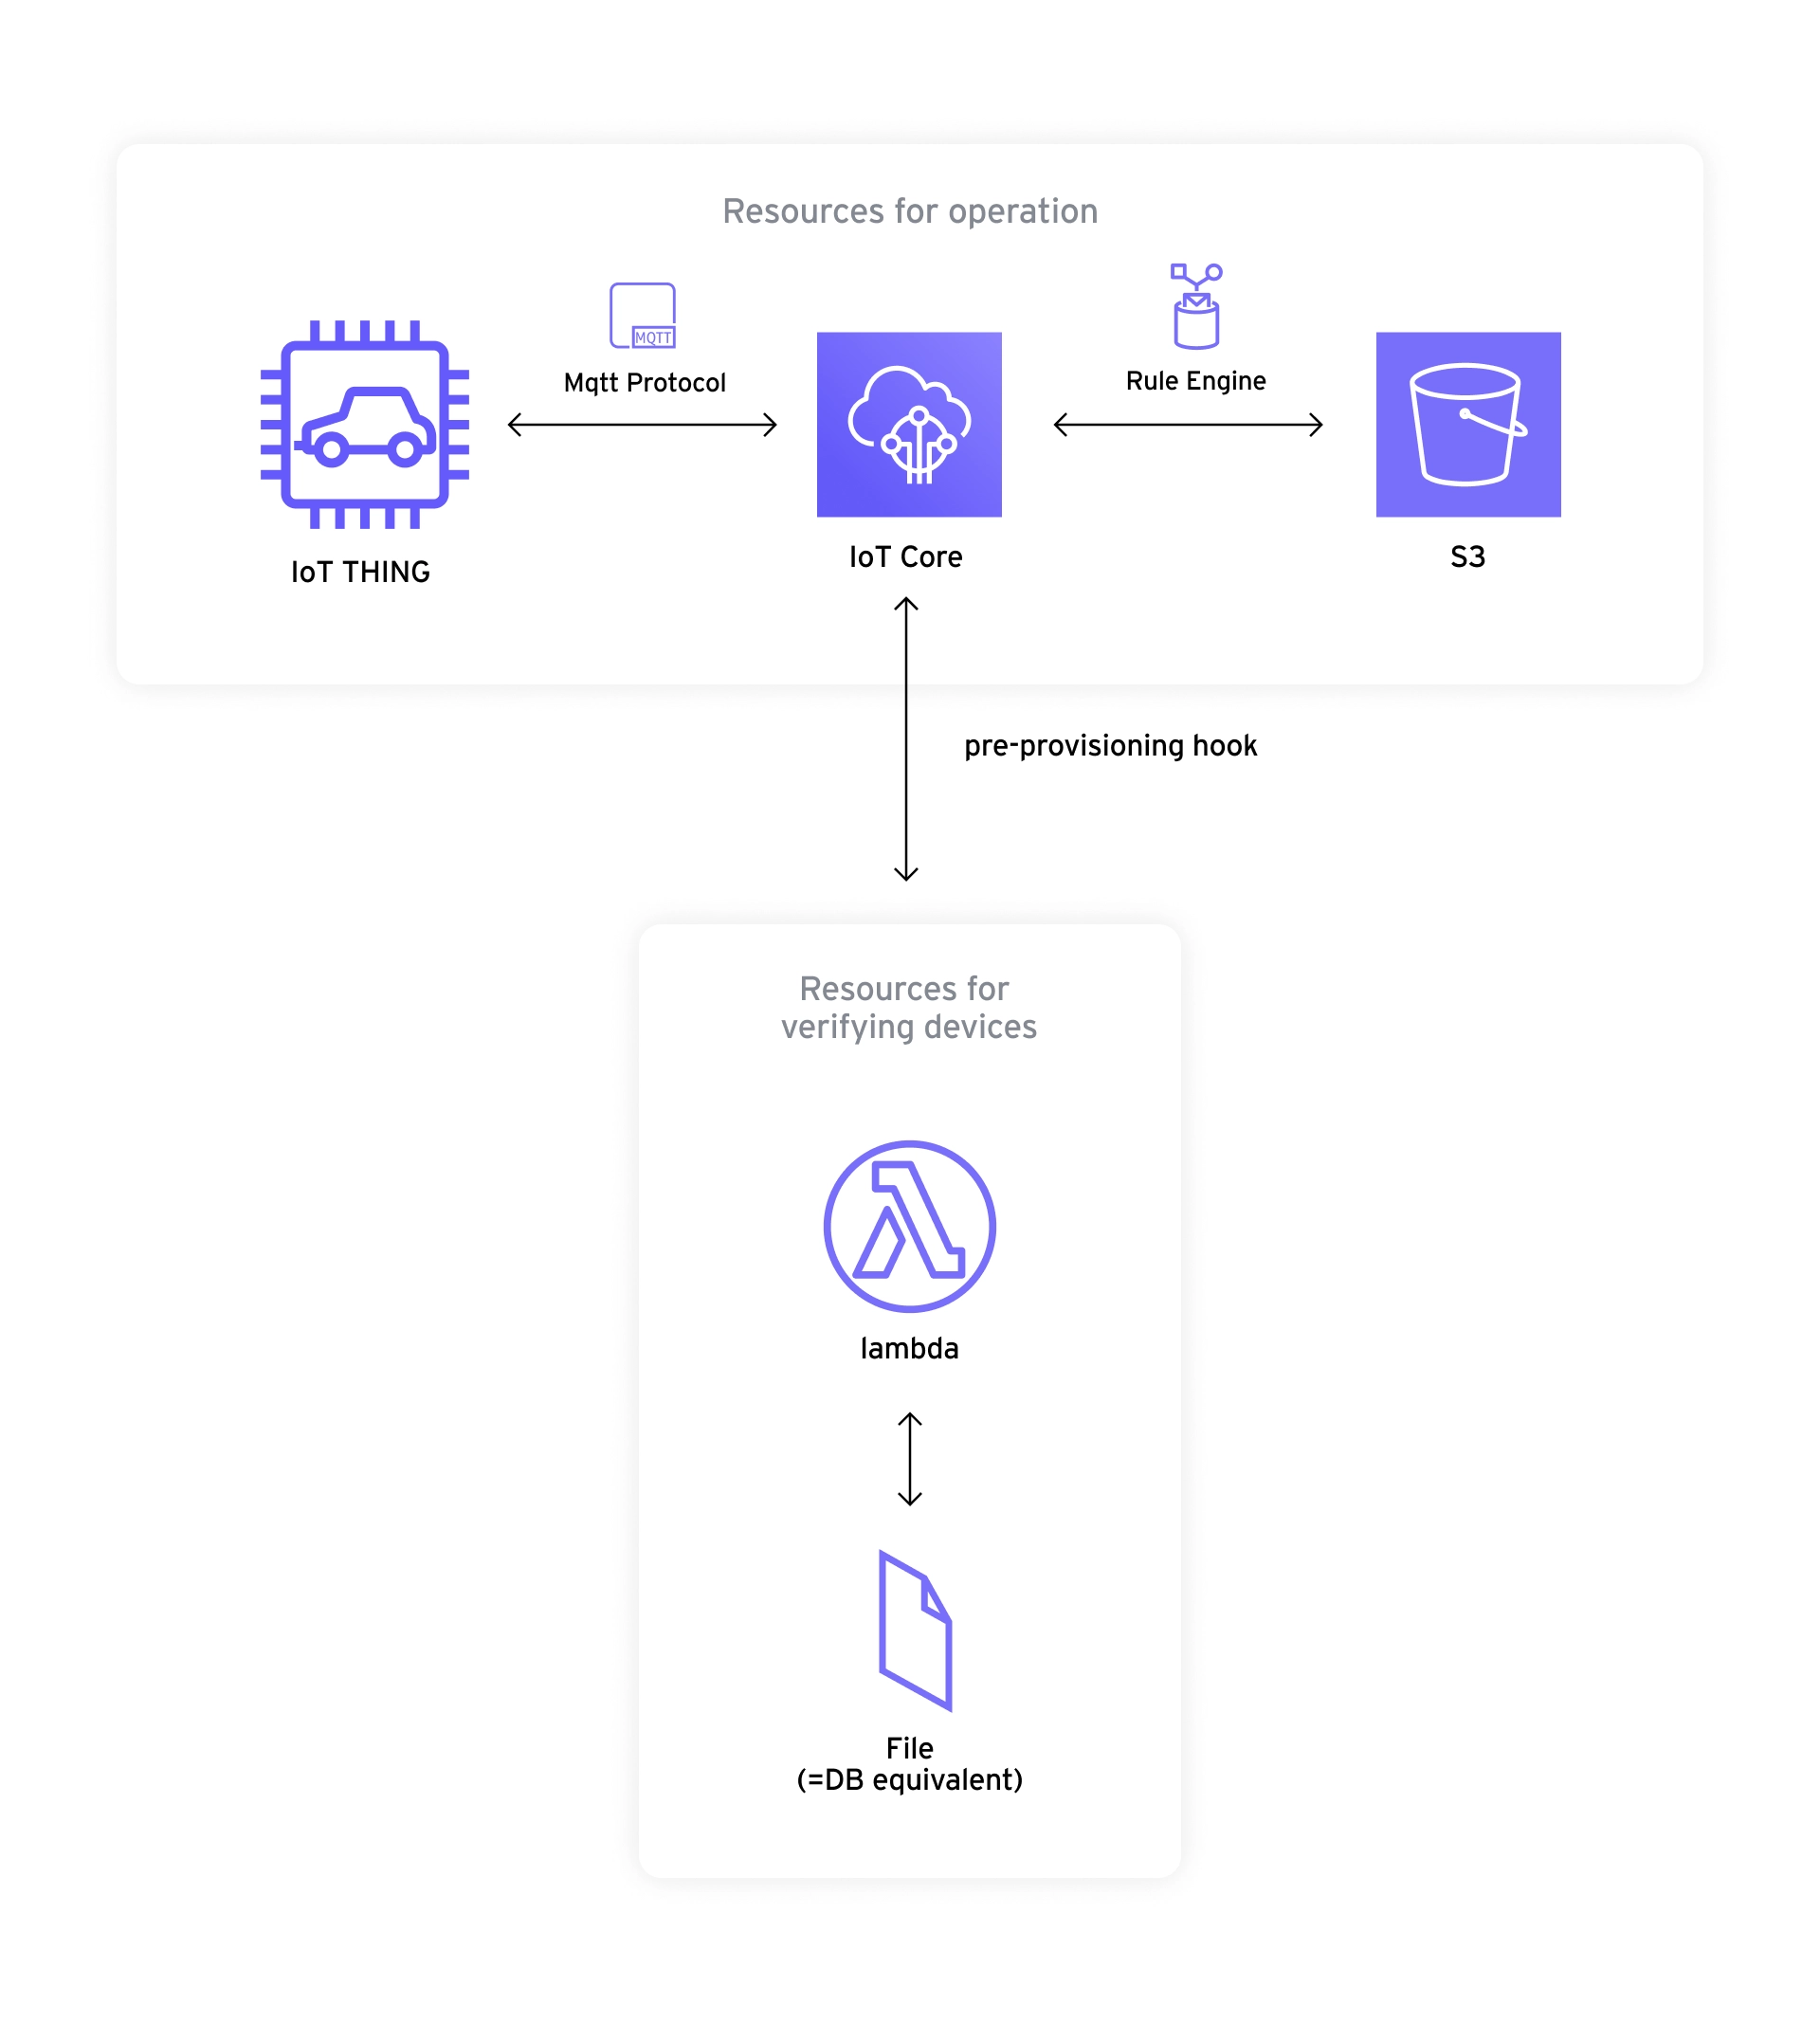
For this article, a simple IoT system is portrayed. Vehicles send status data to a server, and the server saves the data in an S3 bucket. The technical scenario is as below.
- The device in the vehicle sends messages to the IoT core service using the mqtt protocol.
- The AWS IoT Core service that receives the message forwards the message to an S3 bucket via basic ingest.
Basic Ingest is a message routing function provided by AWS IoT core that enables convenient transmission to other services without messaging costs. For this simple example, only two services were provisioned, AWS IoT Core and S3. AWS IoT Core can route messages to a number of AWS services; however, provisioning can get a little more complicated.
2. Device Provisioning
2.1 Scenario-based device provisioning
According to the device provisioning AWS guide, there are three options depending on requirements.
- You can install certificates on IoT devices before they are delivered
The first method is the simplest method, which can be leveraged by the device's manufacturer to identify the user and usage. Because the device manufacturer can be identified, it is possible to store and ship the Permanent Certificate(PC) for final use on the device. This method includes Bulk registration, Just In Time Registration (JITR), and Just In Time Provisioning (JITP).
- End users or installers can use an app to install certificates on their IoT devices
The second method is possible in scenarios where the device manufacturer can identify and trust the device's administrator, and this administrator can eventually issue the PC.
- End users CANNOT use an app to install certificates on their IoT devices
The last option is to use it when the device manufacturer does not know when to use the device, the administrator/end-user, nor when the end user starts using the device. In this case, the device needs to issue a PC on its own.
In the article the last method described above will be used. This method is mainly used in B2C products where it’s difficult to identify users. In other words, it is a device that many unspecified people will use, but advantageous when the management entity is a service provider. In addition to this, ways to validate devices through pre-provisioning hooks and lambda will be implemented.
2.2 Provisioning by claim
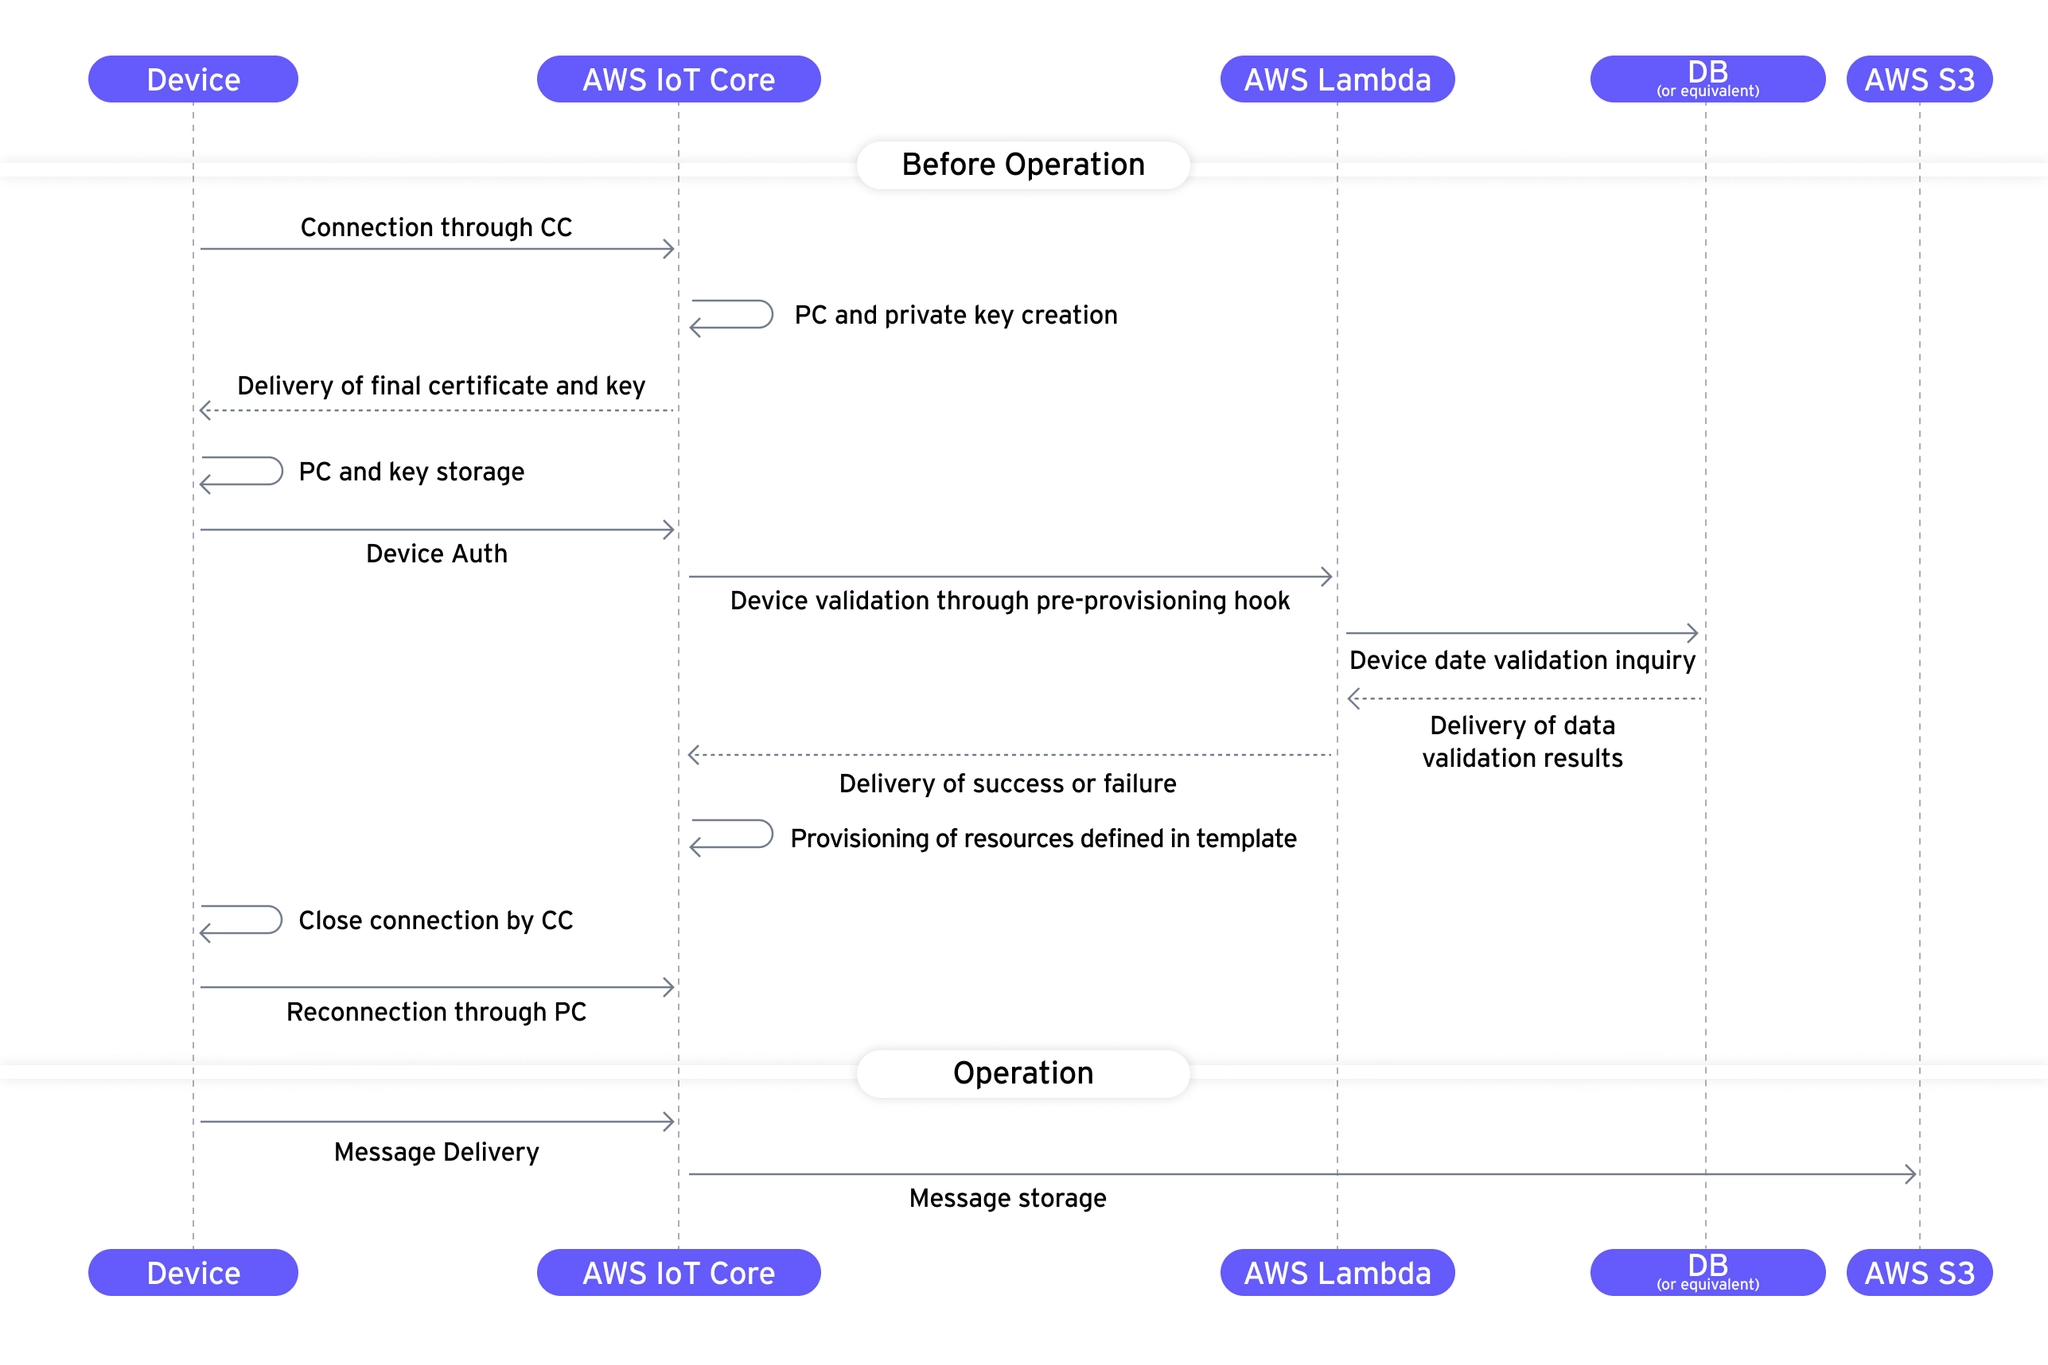
Provisioning by claim is achieved through the following process:
2.2.1 Before operation
1) The device stores a claim certificate (CC) inside when released
2) Devices are connected via AWS IoT Core based on CC when first used
3) When the connection using the CC is completed, IoT Core generates a permanent certificate (hereinafter referred to as PC)
4) IoT Core delivers PCs and keys, and the device stores them
5) Device requests registration with AWS IoT Thing
6) AWS IoT calls AWS Lambda Function with pre-provisioning hooks
7) Lambda queries the verification information for the validity of the terminal and delivers the inquiry to the provisioning service of IoT Core
8) If the query is successful, the provisioning service creates cloud resources as defined in the provisioning template
9) Device disconnects using the claim certificate and connects to AWS IoT core with new certificate. After this normal commences
2.2.2 Operation
1) Devices registered as AWS IoT Thing deliver messages to AWS IoT core
2) The messages received by AWS IoT Core are forwarded to S3 Buckets via the rule engine.
A flowchart of the procedure above would look something like this:
Required Infrastructure Resources
Now let's define the infrastructure resources needed to build a system. The infrastructure resource stack required was divided into three main parts, depending on its function.
Provisioning template and pre-provisioning hook creation
stack name: AwsIotCoreProvisioningInfraStack
The first thing required to implement is the registration of AWS IoT Thing, which has a claim certificate, the issuance of a permanent certificate, and the implementation of a template for the provisioning service.
Claim certificate creation and storage
stack name: AwsIotCoreProvisioningInfraStack
The second thing to implement is the issuance and storage of claim certificates. These generated certificates are stored and shipped together in the device firmware and require a permanent certificate which is provisioned on its first use
Because of claim certificate's reliance on provisioning template they are provisioned together in the same stack AwsIotCoreProvisioningInfraStack
Rule engine message forwarding to S3 Bucket
stack name: AwsIotCoreRuleInfraStack
Lastly, when messages are reported by the device to AWS IoT Core the Rule engine forwards them to AWS S3 via Basic ingest. More on that here
1. Code Implementation - Before step
1.1 json development pattern
All required policies and templates for json documents are based on AWS official documentation (provisioned by claim) and the appropriate environmental variables are updated within the code. This is because CDK code often checks the properties of previously deployed resources, and when using the hard-coded json document it may be unable to track changes. Updating json document code can add an additional layer of complication, and there are confirmed cases when this json update pattern can result in errors.
1.2 Config Setting
Define the configuration in Config/config.ts as appropriate. Where s3BucketNameshould be named uniquely named. In this article, the name cdk-s3-test-bucket will be used for the S3 bucket.
const Config = {
  aws: {
    account: YOUR_ACCOUNT_HERE,
    region: YOUR_REGION_HERE,
  },
  app: {
    service: "cdk-test",
    application: "iot",
    environment: "dev",
  },
  s3BucketName: cdk - s3 - test - bucket,
};
export { Config };
1.3 Initiated Stack and App
The code created by cdk init command has created two main files for us. One will define all the resources for a stack and the other will initiate the stacks into cdk apps.
bin/cdk-test-project.ts → Where all the stacks are deployed as CDK Apps.
lib/cdk-test-project-stack.ts → Where each stack is combined to create a CDK App
cdkTestProjectStack is the default name created by the cdk init command. In this article, two stacks will be composed and deployed - AwsIotCoreProvisioningInfraStack and AwsIotCoreRuleInfraStack. Two separate names were chosen to avoid confusion and to better describe what the stacks are provisioning. The comments in initiated codes are sample codes by CDK, left them for reference.
Changed contents
CdkTestProjectStack → AwsIotCoreProvisioningInfraStack
Additionally to avoid confusion the resource ID (the second input) in AwsIotCoreProvisioningInfraStackwas replaced.
Modified Config
lib/cdk-test-project-stack.ts
import * as cdk from "aws-cdk-lib";
import { Construct } from "constructs";
// import * as sqs from 'aws-cdk-lib/aws-sqs';


export class AwsIotCoreProvisioningInfraStack extends cdk.Stack {
  constructor(scope: Construct, id: string, props?: cdk.StackProps) {
    super(scope, id, props);


    // The code that defines your stack goes here


    // example resource
    // const queue = new sqs.Queue(this, 'CdkTestProjectQueue', {
    // visibilityTimeout: cdk.Duration.seconds(300)
    // });
  }
}
/bin/cdk-test-project.ts
import "source-map-support/register";
import * as cdk from "aws-cdk-lib";
import { CdkTestProjectStack } from "../lib/cdk-test-project-stack";


const app = new cdk.App();
new AwsIotCoreProvisioningInfraStack(app, "AwsIotCoreProvisioningInfraStack", {
  /* If you don't specify 'env', this stack will be environment-agnostic.
   * Account/Region-dependent features and context lookups will not work,
   * but a single synthesized template can be deployed anywhere. */
  /* Uncomment the next line to specialize this stack for the AWS Account
   * and Region that are implied by the current CLI configuration. */
  // env: { account: process.env.CDK_DEFAULT_ACCOUNT, region: process.env.CDK_DEFAULT_REGION },
  /* Uncomment the next line if you know exactly what Account and Region you
   * want to deploy the stack to. */
  // env: { account: '123456789012', region: 'us-east-1' },
  /* For more information, see https://docs.aws.amazon.com/cdk/latest/guide/environments.html */
});
Now everything is prepared and ready to be deployed cdk-test-project-stack.ts
2. Implementation for Provisioning template and pre-provisioning hook
2.1 Policy for test device
This is the device policy for a Thing that has received its permanent certificate and been provisioned. Refer to the Basic AWS IoT Core policy variables here.
device/device-policy.json
{
  "Version": "2012-10-17",
  "Statement": [
    {
      "Effect": "Allow",
      "Action": "iot:Connect",
      "Resource": "*"
    },
    {
      "Effect": "Allow",
      "Action": [
        "iot:Publish",
        "iot:Receive",
        "iot:RetainPublish"
      ],
      "Resource": [""]
    },
    {
      "Effect": "Allow",
      "Action": "iot:Subscribe",
      "Resource": [""]
    }
  ]
}
Insert the above policy using the name testDevicePolicyJson and update the env variables. To simplify the process a relatively wide range of permissions was used, for best practice always follow the AWS model of least privileges. Based on the modified file aws_iot.CfnPolicy the AWS IoT Policy is created. For this it is important to pay close attention to the Resources associated with {Action: [iot:Publish, iot:Receive, iot:RetainPublish]} and the keywords topic and topicfilter for the {Action: iot:Subscribe} action as they have different uses. The policy should be adjusted based on the application.
testDevicePolicyJson.Statement[1].Resource = [
    `arn:aws:iot:${Config.aws.region}:${Config.aws.account}:topic/$aws/rules/*`,
    `arn:aws:iot:${Config.aws.region}:${Config.aws.account}:topic/` + '${iot:ClientId}'
]
testDevicePolicyJson.Statement[2].Resource = [
    `arn:aws:iot:${Config.aws.region}:${Config.aws.account}:topicfilter/` + '${iot:ClientId}'
]

let testDevicePolicy = new iot.CfnPolicy(
    this, Config.app.service + "-" + Config.app.environment + "device-policy",
    {
        policyDocument: testDevicePolicyJson,
        policyName: Config.app.service + "-" + Config.app.environment + "-device-policy",
    }
);
2.2 Role for pre-provisioning-lambda
This is the AWS IAM Role for the previously created pre-provisioning Lambda Function:
let rolePreProvisioningLambda = new iam.Role(
    this, Config.app.service + "-" + Config.app.environment + "-pre-provisioning-lambda-role",
    {
        assumedBy: new iam.ServicePrincipal("lambda.amazonaws.com"),
        description: "AWS IAM role for pre-provisioning lambda",
        roleName: Config.app.service + "-" + Config.app.environment + "-pre-provisioning-lambda-role",
    }
);
2.3 Lambda function for verifying devices
This Lambda function validates the device's serial information when invoked, which is enabled through a pre-provisioning hook. For this function to return True, it must be determined that the device's serial information can be viewed by another system or can be validated through other methods.
import json
import logging
import sys

# Configure logging
logger = logging.getLogger()

for h in logger.handlers:
    logger.removeHandler(h)
h = logging.StreamHandler(sys.stdout)

FORMAT = "[%(asctime)s - %(levelname)s - %(filename)s:%(lineno)s - %(funcName)s - %(message)s"
h.setFormatter(logging.Formatter(FORMAT))

logger.addHandler(h)
logger.setLevel(logging.INFO)

SERIAL_STARTSWITH = "297468"


def verify_serial(serial_number):
    if serial_number.startswith(SERIAL_STARTSWITH):
        logger.info("serial_number {} verification succeeded - starts with {}".format(serial_number, SERIAL_STARTSWITH))
        return True

    logger.error("serial_number {} verification failed - does not start with {}".format(serial_number, SERIAL_STARTSWITH))
    return False


def lambda_handler(event, context):
    response = {'allowProvisioning': False}
    logger.info("event: {}".format(json.dumps(event, indent=2)))

    if not "SerialNumber" in event["parameters"]:
        logger.error("SerialNumber not provided")
    else:
        serial_number = event["parameters"]["SerialNumber"]
        if verify_serial(serial_number):
            response = {'allowProvisioning': True}

    logger.info("response: {}".format(response))
    return response
Before declaring a resource for the lambda function, first, declare the function to be executed in device/verify-device-lambda.py. The example function above is a simple validation function created with Python. To simplify the problem, instead of querying the DB and files, simply verify that Serial Number starts with 297468, and configured it to return True/False values based on the results.
let lambdaPreProvisioningHook = new lambda.Function(
    this,
    Config.app.service + "-" + Config.app.environment +
    "-pre-provisioning-hook-lambda",
    {
        code: lambda.Code.fromAsset(path.join(__dirname, "device")),
        handler: "lambda_function.lambda_handler",
        runtime: lambda.Runtime.PYTHON_3_9,
        role: rolePreProvisioningLambda,
        description: "Lambda for pre-provisioning hook",
        functionName: Config.app.service + "-" + Config.app.environment + "-pre-provisioning-hook-lambda",
    }
);
lambdaPreProvisioningHook.addPermission("InvokePermission", {
    principal: new iam.ServicePrincipal("iot.amazonaws.com"),
    action: "lambda:InvokeFunction",
});
Note the code path and handler path when declaring resources in the AWS lambda function. Through the lambda.Code.fromAsset method the created code can be retrieved. handler within lambda is handler: {python filename}.Write {name of the function that actually works}. Finally, allow the AWS IoT service to invoke the corresponding lambda function. Inside the lambda’s handler, fill the following out like this: handler: {python }.{}. Finally, grant AWS IoT Service permissions to invoke the lambda function.
2.4 Role for provisioning template
Here a role for the provisioning service is created. Since the provisioning service also works through the iot service, set the subject of the assume to iot.amazonaws.com.
let roleProvisioning = new iam.Role(
    this, Config.app.service + "-" + Config.app.environment + "-provisioning-template-role",
    {
        assumedBy: new iam.ServicePrincipal("iot.amazonaws.com"),
        description: "AWS IAM role for provisioning services",
        roleName: Config.app.service + "-" + Config.app.environment + "-provisioning-template-role",
    }
);
roleProvisioning.addManagedPolicy(
    iam.ManagedPolicy.fromAwsManagedPolicyName(
        "service-role/AWSIoTThingsRegistration"
    )
);
2.5 ProvisioningTemplate
Here the provisioning template that defines the provisioning services are created. Defining the template is one of the most important parts for provisioning. Refer to an example base provisioning template provided by AWS here.
In this article for fleet provisioning, a template that specifies the ThingName pattern as test-thing-{SerialNumber} is configured. In the base template, match the ThingName section by inserting the following:
"ThingName": {
  "Fn::Join": [
    "",
    [
      "test-thing-",
      {
        "Ref": "SerialNumber"
      }
    ]
  ]
}
device/provisioning-template.json
{
  "Parameters": {
    "SerialNumber": {
      "Type": "String"
    },
    "AWS::IoT::Certificate::Id": {
      "Type": "String"
    }
  },
  "Resources": {
    "certificate": {
      "Properties": {
        "CertificateId": {
          "Ref": "AWS::IoT::Certificate::Id"
        },
        "Status": "Active"
      },
      "Type": "AWS::IoT::Certificate"
    },
    "policy": {
      "Properties": {
        "PolicyName": ""
      },
      "Type": "AWS::IoT::Policy"
    },
    "thing": {
      "Type": "AWS::IoT::Thing",
      "OverrideSettings": {
        "AttributePayload": "MERGE",
        "ThingGroups": "DO_NOTHING",
        "ThingTypeName": "REPLACE"
      },
      "Properties": {
        "AttributePayload": {},
        "ThingGroups": [],
        "ThingName": {
          "Fn::Join": [
            "",
            [
              "test-thing-",
              {
                "Ref": "SerialNumber"
              }
            ]
          ]
        }
      }
    }
  }
}
Within the CDK code, associate the policy for the provisioning service to the document configured above and convert it to a provisioning template resource through the CfnProvisioningTemplate command. The pre-provisioning hook is set through the parameter inside the preProvisioningHook. Because the lambda function must be invoked each time during each provisioning process, the preProvisioningHook option simply sets the payloadVersion and the targetArn of the lambda defined above as parameters.
testProvisioningTemplateJson.Resources.policy.Properties.PolicyName = testDevicePolicy.policyName!
testProvisioningTemplateJson.Resources.policy.Properties.PolicyName = testDevicePolicy.policyName!

let testProvisioningTemplate = new iot.CfnProvisioningTemplate(
    this, Config.app.service + "-" + Config.app.environment + "-provision-template",
    {
        provisioningRoleArn: roleProvisioning.roleArn,
        templateBody: JSON.stringify(testProvisioningTemplateJson),
        enabled: true,
        preProvisioningHook: {
            "payloadVersion": "2020-04-01",
            "targetArn": lambdaPreProvisioningHook.functionArn
        },
        description: "AWS IoT Provisioning Template",
        templateName: Config.app.service + "-" + Config.app.environment + "-provision-template",
    }
);
3. Claim Certificate and related AWS Infra resources provisioning
3.1 Resources not provisioned through the CDK
AWS IoT Core typically uses the Console to build infrastructure. Because there are many resource elements intertwined, it is most convenient to implement them intuitively through the console. In addition, since AWS IoT is a relatively new service compared to other services, CDK official documents are lacking in detail and explanations. Best efforts were made to reference the CDK documents to replace manual steps through the console, but sometimes the CDK is lacking in functionality available only through the console or CLI. For this, create custom resources or use the ConstructHub.
- ConstructHub
- Many variations of IAC resources for AWS can be found here. Not only for the CDK but for other IAC tools such as terraform.
- AWS custom resources
- Custom resources supported in the CDK
- SDK or CLI commands can be utilized here to create CDK deployable resources.
For this section, the base CDK was not utilized, but instead an attempt was made to utilize an AWS Custom Resource to generate our certificates.
3.2 S3 Bucket
First, create an S3 Bucket to store our claim certificate. Set the S3bucketName in the config.ts file. If the project requires a pre-existing bucket for this, the methods (fromBucketArn, fromBucketAttributes, fromBucketName) can be utilized.
let cdkTestS3Bucket = new s3.Bucket(this, 'cdkTestS3Bucket', {
    blockPublicAccess: s3.BlockPublicAccess.BLOCK_ALL,
    versioned: true,
    removalPolicy: RemovalPolicy.DESTROY,
    autoDeleteObjects: true,
    bucketName: `${Config.s3BucketName}`
    }
    );
3.3 Policy for Claim Certificate
First, define the policy that the temporary claim certificate will use. The claim certificate policy is based on the basic IoT policy.
device/device-policy.json for the claim certificate policy here, reference the AWS official documents here.
device/cc-policy.json1
{
  "Version": "2012-10-17",
  "Statement": [
    {
      "Effect": "Allow",
      "Action": ["iot:Connect", "iot:RetainPublish"],
      "Resource": "*"
    },
    {
      "Effect": "Allow",
      "Action": ["iot:Publish","iot:Receive", "iot:RetainPublish"],
      "Resource": [""]
    },
    {
      "Effect": "Allow",
      "Action": "iot:Subscribe",
      "Resource": [""]
    }
  ]
}
Update the above-defined base policy with the required contents and it will be created by the CfnPolicy command named testDeviceClaimCertificatePolicy. Since the provisioning is requested through the claim certificate a provision policy must also be defined.
let templateTopicCreate = `arn:aws:iot:${Config.aws.region}:${Config.aws.account}:topic/$aws/certificates/create/*`
let templateTopicProvisioning = `arn:aws:iot:${Config.aws.region}:${Config.aws.account}:topic/$aws/provisioning-templates/${testProvisioningTemplate.templateName}/provision/*`
testDeviceClaimCertificatePolicyJson.Statement[1].Resource = [templateTopicCreate, templateTopicProvisioning]

let templateTopicFilterCreate = `arn:aws:iot:${Config.aws.region}:${Config.aws.account}:topicfilter/$aws/certificates/create/*`
let templateTopicFilterProvisioning = `arn:aws:iot:${Config.aws.region}:${Config.aws.account}:topicfilter/$aws/provisioning-templates/${testProvisioningTemplate.templateName}/provision/*`
testDeviceClaimCertificatePolicyJson.Statement[2].Resource = [templateTopicFilterCreate, templateTopicFilterProvisioning]

let testDeviceClaimCertificatePolicy = new iot.CfnPolicy(
    this, Config.app.service + "-" + Config.app.environment + "-claim-certificate-policy",
    {
        policyDocument: testDeviceClaimCertificatePolicyJson,
        policyName: Config.app.service + "-" + Config.app.environment + "-claim-certificate-policy",
    }
);
3.4 Claim Certificate(CustomResource)
Now let's looks the claim certificate process. Through the AWS IoT Core Console certificate tab certificates can be easily be generated, but unfortunately the CDK does not support those commands. The certificates use Open SSL and are typically created through CLI making it difficult to provision through IAC.
However as mentioned earlier, AwsCustomResource can be utilized to create the certificate and store it in S3. Utilized the AWS SDK CreateKeysAndCertificateapi, a cdk custom resource can be used to call the API and output 4 objects certificateArn, certificatePem, keyPair.PublicKey, and keyPair.PrivateKey .
let createKeysAndCertificateForClaimCertificate = new AwsCustomResource(
    this, Config.app.service + "-" + Config.app.environment + "-create-keys-and-certificate-for-claim-certificate",
    {
        onUpdate: {
            service: "Iot",
            action: "createKeysAndCertificate",
            parameters: {setAsActive: true},
            physicalResourceId: PhysicalResourceId.fromResponse("certificateId"),
            outputPaths: ["certificateArn", "certificatePem", "keyPair.PublicKey", "keyPair.PrivateKey"],
        },
        policy: AwsCustomResourcePolicy.fromSdkCalls({resources: AwsCustomResourcePolicy.ANY_RESOURCE}),
    }
);
3.5 Key Deployment to S3(CustomResource)
In this section, the method for storing the objects in S3 will be explained. In the above process, a Claim Certificate object has already been received and the S3 bucket has already been provisioned in previous steps. Using the cdkTestS3Bucket as the destinationBucket the keys of the claim-certificate can be stored from the response field of the custom resource.
let keyDeploymentForDeviceClaimCertificate = new aws_s3_deployment.BucketDeployment(
    this, Config.app.service + "-" + Config.app.environment +  "put-key-to-s3",
    {
        destinationBucket: cdkTestS3Bucket,
        sources: [
            aws_s3_deployment.Source.data(
                "claim-certificate/claim.pem",
                createKeysAndCertificateForClaimCertificate.getResponseField(
                    "certificatePem"
                )
            ),
            aws_s3_deployment.Source.data(
                "claim-certificate/claim.public.key",
                createKeysAndCertificateForClaimCertificate.getResponseField(
                    "keyPair.PublicKey"
                )
            ),
            aws_s3_deployment.Source.data(
                "claim-certificate/claim.private.key",
                createKeysAndCertificateForClaimCertificate.getResponseField(
                    "keyPair.PrivateKey"
                )
            ),
        ],
    }
);
3.6 Policy attachment for claim Certificate
Finally, attach the certificate claim to the policy.
let PolicyPrincipalAttachmentForClaimCertificate =
    new iot.CfnPolicyPrincipalAttachment(this, Config.app.service + "-" + Config.app.environment + "policy-principal-attachment", {            policyName: testDeviceClaimCertificatePolicy.policyName!,            principal: createKeysAndCertificateForClaimCertificate.getResponseField("certificateArn")});
4. Rule engine for routing messages to S3 storage
In this part, add the lib/aws-iot-core-rule-infra-stack.ts file which contains the AwsIotCoreRuleInfraStack stack. This stack will use the two JSON files rulePolicyJsonand ruleKeysJson. Import these into the stack at the beginning. It can be done like this:
import {
    Stack,
    StackProps,
    aws_iot as iot,
    aws_iam as iam,
    aws_s3 as s3,
} from "aws-cdk-lib";
import { Construct } from "constructs";
import { Config } from "../config/config";
import rulePolicyJson from "./rule/rule-policy.json";
import ruleKeysJson from "./rule/rule-keys.json";

export class AwsIotCoreRuleInfraStack extends Stack {
    constructor(scope: Construct, id: string, props?: StackProps) {
        super(scope, id, props);
    }
}
4.1 Role for rule Engine
Rule Engines is one of the internal services of AWS IoT Core. The Rule Engine plays the function of relaying messages to other services. First make an AWS IAM Role for the rule engine and grant it the ability to assume IoT Core with the subject iam.ServicePrincipal(iot.amazonaws.com).
//  Create role for Rule engine
let roleRuleEngine = new iam.Role(
    this, Config.app.service + "-" + Config.app.environment + "-rule-engine-role", {
        assumedBy: new iam.ServicePrincipal("iot.amazonaws.com"),
        description: "AWS I AM role for IoT rule engine",
        roleName: Config.app.service + "-" + Config.app.environment + "-rule-engine-role",
    }
);
4.2 s3 bucket (revisited)
Next, import the existing S3 bucket in typescript using the CDK. Since S3 is used to store the claim certificates as part of the earlier AwsIotCoreProvisioningInfraStack it already exists. Store the name of the S3 bucket in the typescript config/config.ts file and reference it as ${Config.s3BucketName}.
// Get S3 bucket from bucket name
let cdkTestS3Bucket = s3.Bucket.fromBucketName(this, "cdkTestBucket",`${Config.s3BucketName}`);
4.3 Policy for role for rule
Time to define the required policy for the Rule Engine. It requires the s3:PutObject permissions to store messages. The policy in a JSON file is defined like this:rule/rule-policy.json
{
    "Version": "2012-10-17",
    "Statement": [
        {
            "Action": "s3:PutObject",
            "Resource": [""],
            "Effect": "Allow"
        }
    ]
}
In the defined rule-policy.json base file update the S3 Resource and create the policy. After a policy is created, assign it to the IAM role that was created earlier.
// Create policy and attach it to IoT Role.
rulePolicyJson.Statement[0].Resource = [cdkTestS3Bucket.bucketArn + "/*"]
let iotCoreRolePolicy = iam.PolicyDocument.fromJson(rulePolicyJson);

new iam.Policy(
    this,
    Config.app.service + "-" + Config.app.environment + "-iot-core-role-policy",
    {
        document: iotCoreRolePolicy,
        policyName: "iotCoreRolePolicy",
    }
).attachToRole(roleRuleEngine);
4.4 Rule for pre-defined keys
Now, make an IoT Core rule. In this post, three rules will be provisioned: rule1, rule2, and rule3. The roles will be used by the following Json document to create multiple rules at the same time through iteration.rule/rule-keys.json
{
    "testRules": [
        "rule1",
        "rule2",
        "rule3"
    ]
}
Each rule created through the CDK code is created with a test-rule/{key} naming convention. The Keys are used to record data in S3 files and according to the AWS Docs, it’s best to include a timestamp. So accordingly create keys with a${topic()}/${timestamp()} naming convention. Additionally, to ensure the topics are easily queryable with SQL we decided to use `SELECT * FROM 'test-rule/${key}'`. Again here a 'for loop' was used for iteration to ensure that each testRules were provisioned accordingly.
// Get rules from ruleKeysJson
let testRuleKeys = ruleKeysJson.testRules;

// Create Rules in IoT Core
testRuleKeys.forEach((key) => {
    new iot.CfnTopicRule(
        this, Config.app.service + "-" + Config.app.environment + `-topic-rule-${key}`,
        {
            topicRulePayload: {
                actions: [
                    {
                        s3: {
                            roleArn: roleRuleEngine.roleArn,
                            bucketName: `cdk-s3-test-bucket`,
                            key: "${topic()}/${timestamp()}",
                        },
                    }
                ],
                sql: `SELECT * FROM 'test-rule/${key}'`,
            },
            // iot does not allow rule '-' (dash).
            ruleName: `test_rule_${key}`,
        }
    );
});
Now all the steps have been completed. When an IoT Device sends a message, it is forwarded via the topic-rule/${key} topic. and saved in an S3 bucket with the naming convention ${topic()}/${timestamp()} . The ability to forward messages to other AWS services through this simple rule definition is called basic ingest, which is not charged by AWS. The fact that AWS doesn’t charge for basic ingest is its biggest advantage when storing logs or creating S3 Data lakes.
5. The structure of the cdk app provisioned
This is the file structure tree created from the CDK Init command
cdk-test-project
├── README.md
├── bin
│   └── aws-iot-infra.ts
├── cdk.json
├── config
│   └── config.ts
├── jest.config.js
├── lib
│    ├── aws-iot-core-provisioning-infra-stack.ts
│    ├── aws-iot-core-rule-infra-stack.ts
│    └── device
│    │    ├── device/device-cc-policy.json
│    │    ├── device/device-policy.json
│    │    ├── device/provisioning-template.json
│    │    └── device/verify-devices-lambda.py
│    └── rule
│         ├── rule/rule-keys.json
│         └── rule/rule-policy.json
├── node_modules
├── package-lock.json
├── package.json
├── test
├── tsconfig.json
└── yarn.lock
In this article, a system to collect device data with AWS IoT Core deployed through the AWS CDK was provisioned.
Operational Scenario Summary
- The messages generated by the devices are sent to AWS IoT Core
- Claims and certificates were used to make this possible
- A lambda provisioning hook was used to validate the device validation
AWS CDK provisioned resource summary
Provisioning template and pre-provisioning hook provisioning
Device policy, device validation lambda provisioning AWS IAM Role, and provisioning template definitions
Claim certificate creation and storage
S3 bucket, claim certificate policy, Claim certificate provisioned through AWS Custom Resource, process for storing it onto S3, and policy attachment to certificate.
Device message delivery through AWS IoT Core Rule engine’s Basic Ingestion for S3 storage.
Rule Engine IAM Role and Policy, Rule definition
Conclusion
In this post, the CDK was used to provision AWS IoT Core System for device registration and storage. Whenever architecting a new Infrastructure it is important to understand the functions of the different AWS Services such as EC2 and S3. By using the AWS CDK tool the highest level of compatibility was ensured. As the complexity and scale of the infrastructure increase, it helps to take a more declarative approach when defining the architecture. Tools like Terraform or the AWS CDK help make this possible. AWS CDK is officially supported and maintained by AWS themselves and is an excellent IAC tool if the lack of vendor agnosticism is not a conncern. Even though it’s possible to deploy resources like this using the AWS Console or CLI it becomes increasingly difficult over time and harder to increase the scale of applications.
Unfortunately, AWS IoT Core is a relatively new service within AWS services, where the official document description still leaves a lot to be desired. There were a couple of blockers while developing this with the CDK especially with the provisioning of certificates (a function supported by the SDK).
To overcome this, the AwsCustomResource construct of the CDK was utilized to create the custom code to call the AWS API with the SDK commands. As described by AWS Documentation “Defines a custom resource that is materialized using specific AWS API calls. These calls are created using a singleton Lambda function”. The hope is that AWS continues to improve the CDK constructs for IoT as the service continues to mature.

Seungbeom Lee | Fleet Platfrom
In charge of Fleet Platform software and Intelligent Fleet Safety solutions.
Jinhyeong Kim | Fleet Platform
In charge of developing Fleet Platform System software
Alec Zebrick | Cloud Infrastructure
In charge of developing cloud infrastructure and kubernetes for autonomous driving technologies
References
1) Official
2) Blogs